
As someone who’s pretty OCD when it comes to being tidy and organised, I cringe whenever I look over someone’s shoulder and see a computer desktop that’s full of files and folders. I’m sure some people actually like to work like this with everything quickly accessible on the desktop.
But this is a bit like doing the laundry and instead of tidying your clothes away into your wardrobe and drawers, you leave everything on the floor so you can get quick access to your t-shirts.
I feel the vast majority of people use their desktop, downloads or documents folders as dumping grounds for files because they’ve never thought about how to use the desktop or how to organise files into a folder structure.
Well worry no longer, today I’m going to show you how to get on top of all your files. And believe me when I say, your environment really does reflect how you feel and a tidy computer will contribute to a tidy mind.
How to organise files and folders (because a tidy computer contributes to a tidy mind)Click To Tweet [youtube https://www.youtube.com/watch?v=NFi_-nGWbBs]How (and when) to use the Desktop, Downloads and Documents
First things first, let’s clarify when and how to use the Desktop, Downloads and Documents folders (both the PC and Mac have these three areas for dumping files):
- Downloads – As the name suggests, this is where files downloaded from the web or your email first land. The key use of the downloads folder is to use it as a temporary holding place. Files should not live in here long-term. I’ll sometimes keep files in here for a day or two while I’m using them. But eventually, the files get either 1) stored in my file structure (see below), or 2) deleted.
- Desktop – I rarely use the Desktop at all. Its function is pretty much the same as the Downloads folder. It’s a temporary holding place. A scenario where I will typically use it is when I save a file that I’m working on if I don’t intend to keep that file in the long-run. I’ll keep it on the desktop temporarily while I use it before it gets deleted. A bit like how you might keep a paper document on your desk short-term before you throw it away or store it in a filing cabinet.
- Documents – Finally, the Documents folder is where you can start to organise your files and folders. This is where documents should live in the long-run (not on the desktop or in your downloads). Because I use Dropbox for all personal and business file storage, I use this as my main storage folder instead of Documents. But if you don’t use a cloud storage medium, use Documents.

Now that we know how to use these three primary folders, let’s look at how to organise your files and folders within Documents.
How to structure your folders
The most common way to organise files it to create folder parent folders as broad categories, then within these parent folders, break it down into sub-folders as much as needed.
For example, as you can see below, my “Business” folder breaks down into sub-folders like Accounting, Products and Podcast:

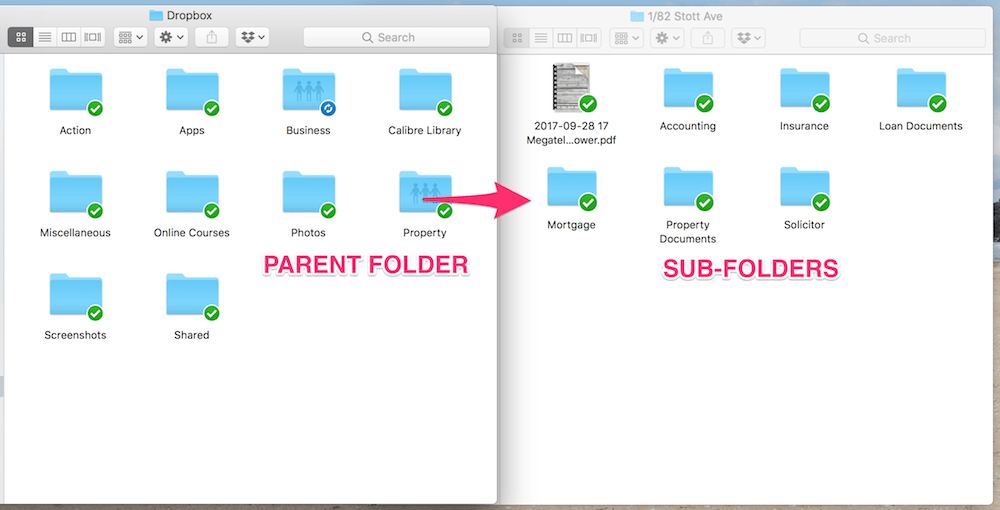
I have primary folders like “Property” for everything related to our house like building reports and insurance:
I also have a few functional folders:
- Shared – Used to temporarily hold files like call recordings that I want to share with clients. I use Hazel to automatically delete them after 14 days so my Dropbox doesn't get too full with big movie files.
- Screenshots – I’ve enabled the Dropbox setting to save screenshots taken on my computer here (instead of messing my Desktop). Because screenshots are usually used straight away in things like email, I then have Hazel go in and delete them after 24 hours.
- Apps – This is a default Dropbox folder that apps like TextExpander, Hazel and others use to save settings to so that apps work across devices.
- Action – Used for automation purposes e.g. saving receipts to which then get renamed and stored (read more about how I do this with Hazel).
Finding documents
One of the arguments for keeping files on the Desktop or in Downloads is to get quick access to them. People think that by burying files in a deep folder structure that files will take ages to find.
Sorry, I don’t buy this argument…
On the Mac, a quick shortcut, Command + Space will bring up Spotlight search (this is one of the most useful shortcuts on the Mac). PC users can use the search function in the Start menu.
With a quick search, you can find files much quicker than clicking and navigating through your file structure. You don’t even have to use words in the title of the document. Spotlight even searches the content of the document to help find the thing you’re looking for.
I can almost guarantee that using a search like this is going to be quicker than scanning a sea of files on your desktop.
PRO-TIP: When it comes to naming files, keep the names short but descriptive. Say what the document is. For things like invoices and receipts, it’s a very good idea to use a date prefix like “2018-03-07 NAME”.
Tagging your files
Another way to find files or get quick access to more commonly used files is to use Tags. Think of tags as a way of grouping files together from many different folders and locations on your computer. I was slow to adopt Tags in the Mac Finder. But now I’m hooked.
A simple “Favourite” tag allows me to quickly access the PDF’s, spreadsheets and images I use on a frequent basis.

I also have a “Resources” tag so I can get quick access to free downloads that I offer on my website in case I want to email them to someone.
The tags you use will depend on the type of files you’re storing and the nature of your work. You can set up whatever tags you like.
So, there’s my system for organising files and folders on the Mac. Of course, this is just one fairly simple approach. If you have an alternate method, I’d love to hear what you’re doing to organise your files. Let me hear your method in the comments below!