Evernote is one of the most powerful tools you can use for increasing your productivity. Naturally it made the list of my “Top 10 Productivity Tools” and is one of the apps I feel I really couldn't live without. I use Evernote for managing work projects, my website projects, personal projects, home DIY projects and more. There are almost no limitations to Evernote and what you get out of it is only limited by your imagination. I've received some questions about how to use Evernote and how to get more out of it, so he's a run down on how to get started and some of my tips for maximising your productivity using Evernote.
WHAT IS EVERNOTE?
I'll start by defining what Evernote actually is (in case you read that introduction thinking: “what the heck is he talking about?”). Evernote is a note taking app that lets you collect resources in one place and work on projects or tasks. You organise your Notes into Notebooks and use Tags to categorise different Notes into common topics. For example, I have Notebooks for “Website”, “Productivity Resources”, “Home”, “Wedding” and more. Generally I use the Notebooks to collect the resources and work for the different areas of my life. i.e. anything related to my website will be stored in the “Website” notebook. Whether that's ad copy for a sales page, blog post drafts or designs ideas I've seen from other website. It all gets stored in the “Website” Notebook.
Evernote is incredibly versatile and Notes be almost anything and get created from almost anywhere. With the Evernote Web Clipper for Chrome and Safari, you can clip entire blog posts and turn them into Notes. Or you might choose to save just a link or an image from a page. You can use the Evernote app on your smartphone or desktop to capture audio notes and use your camera to create notes from things you see. This is a great way of taking the notes you make on paper and digitising them to keep them safe and accessible.
One of the brilliant things about Evernote is that it'll scan the contents of all your Notes, including text inside images and PDFs (Premium users only) and index this for later. So for example, if you take a picture of a bottle of red wine that you like, you could search for “Merlot” and Evernote will recognise the text from the label on the bottle and bring up that Note in your search results. With all these different ways of creating and capturing ideas, Evernote really is the best place for storing things you'd like to remember for later.
Not only is Evernote perfect for collecting your resources in one place, but it's the ideal place to actually do your work. I rarely use Word processing apps like Google Docs or Pages any more. Instead I simply navigate to Evernote (which is always open on my computer) and create a new Note. Because Evernote is where you collect and store a lot of the resources, whether it's an article you might need to refer to, or some design concepts, it makes doing your work much more efficient as you can switch between Notes. Or better yet, open your Notes in separate windows and work with everything you need side-by-side.
WHY YOU SHOULD USE EVERNOTE
The brilliant thing about keeping everything in Evernote is that you'll have all your most important work and resources with you wherever you go. At the tap of a button you can then get access to a valuable piece of information and edit your Notes from wherever you are. This level of access to your information is incredibly valuable and allows you to work from anywhere, dramatically improving your productivity. Evernote is also very pleasing to use. Instead of opening a Word or Pages document, it's much more convenient to open a new Note and plan your projects in a space where you have all the resources you need just a click away. Here are the most common uses (I find) for using Evernote:
- Collecting articles of productivity blog posts I like and might want to refer back to. These go into my “Productivity Resources” folder and I Tag all these blog posts with “Article”.
- Collecting links to websites that I might want to try out later. For example, there are lots of cool apps and tools I'd like to try within my business but aren't that relevant to me yet. These get added to my “Business Resources” folder.
- Photographing receipts of big ticket purchases. Then I can ditch the receipt and go paperless knowing I've got a copy of my receipt if I ever have any issues. These get tagged with “Receipts”.
- Collecting design ideas and DIY concepts for projects round the house. These go into my “Home” Notebook with tags like “DIY” and “@SOMEDAY” (I'll explain what this means later).
- Planning blog posts and drafting my articles. These go into my “Website” Notebook with the Tag “Blog Idea”.
- Taking notes during Webinars or training sessions. These will go into “Business Resources” or just my personal “Notebook” depending on what it's about. I then tag it with “webinar” so I can group all of the notes from webinars I've listened to.
- Writing book summaries. I like to write a summaries of the non-fiction books that I read so that I can quickly refer back to them later. These go into my “Notebook” with the tag “book summary”.
- Collecting photographs of Wedding decorations. As we're planning a wedding, this has been really useful. We often see stuff we like online or out and about and Evernote is the perfect place to store our ideas. These go into my “Wedding” notebook with Tags like “Decoration”, “Lighting” or “Invites”.
Of course, this is just what I use Evernote for, but you can make what you want of it. Evernote is simple yet powerful and can be useful for managing and working on any project or task you can think of.
HOW TO GET STARTED WITH EVERNOTE
It took me a while to get comfortable with Evernote and fit it into my workflow. Detailed below are my recommendations for how to get started but bear in mind that this is an evolving process. I’m constantly going through my Tags and tidying them up, adding new ones or deleting redundant ones. I'll often restructure my Notebooks to something that makes more sense. As you spend more time using Evernote, you'll learn what's best for you and develop your own ways of organising your work. I'd like to reinforce the fact that what you get our of Evernote is determined by what you put in; when you get started spend some time gathering your resources and creating your first few Notes.
Step One: Create Your Notebooks
 After downloading Evernote on your computer, I recommend you start by creating the Notebooks for the different areas of your life that you're likely to use Evernote for. You might have Notebooks for “Work” and “Home”. However you might choose to get really specific and subdivide “Home” into “DIY Projects”, “Gardening Projects”, “Interior Design” and “Wish List”. You can nest Notebooks within one another. So “Home” could be the top-level and each of these four Notebooks can be nested within here. This is just another way of creating structure within your Notes.
You'll find that the more you use Evernote, the more Notebooks you create. I have a “Resources” Notebook with sub-Notebooks for “Productivity Resources” and “Business Resources”. These Notebooks are where I store blog posts that I clip from the web. It’s just my personal preference, but I like to keep these articles, or resources, separate from the Notes I’m actually working on.
Step Two: Install the Web Clipper
This is one of the primary tools I use for collecting resources when I'm surfing the web. The Web Clipper can be installed on Chrome or Safari and is perfect for clipping links, articles and images from around the web. You can choose your Notebook and add Tags right inside the Web Clipper without even opening Evernote. One of the lesser known features of Evernote is it's ability to display search results from your Notes on Google search pages. This is super handy as you can Google a topic and get everything that's relevant from your Evernote account displayed to you along side the normal Google search results. This is a setting that's activated within the Web Clipper and I highly recommend you enable it after installing the Web Clipper extension.
Step Three: Download Smartphone App
 By far one of the best ways to use Evernote is on the go. As you never know when inspiration will hit or when you're going to see something you'd like to remember, the Evernote smartphone app is a must! I use Evernote for iOS and one of the features I enjoy the most is the ability to view your latest Notes or create a new Note right from your Notification Centre. It literally takes one swipe and a tap to launch the Evernote camera and take a quick photo. The app is incredibly useful for accessing your Notes and making edits while you're out and about. The app syncs seamlessly with the desktop client so everything is ready and waiting when you get back home or to the office. With Evernote premium you can download your Notes for offline use. This is really handy if you're going to be out of cell or wifi range, for example on a flight, meaning there really is no excuse for not getting work done.
Step Four: Download Skitch

Skitch, is an extremely useful screenshot and annotation app that's part of the Evernote family. The desktop and mobile app lets you create screengrabs, capture photos, annotate maps, PDFs (Premium only) and more. The great thing about this little app is that once you've grabbed and annotated you image, you can seamlessly sync the image or file to Evernote. If you ever need to edit or add to your annotations, you can click a button right inside Evernote to open up Skitch and make your changes.
Check out how I used Evernote and Skitch to find our lost cat. I find myself using Skitch for DIY projects around the house and recording measurements. It's super handy to be able to whip out your phone, snap a photo and add some lines and text with the measurements you need to remember. Say goodbye to scrappy pieces of paper and confusing diagrams.
Step Five: Download Swipes
 One of the simple and extremely useful features of Evernote is the ability to create checklists within your Notes. Checklists are great for tracking the progress made on a project and outlining the steps that need to be completed before marking a project as complete. Swipes is an awesome to-do app that syncs with your Evernote account. Swipes will create a task from any Note with the “swipes” Tag and recognises with these checklists and creates sub-tasks within your to-do. Swipes was the Gold Winner of the Evernote Platform Awards and for good reason; it's a beautiful app for managing not just your Evernote tasks, but your other to-dos as well.
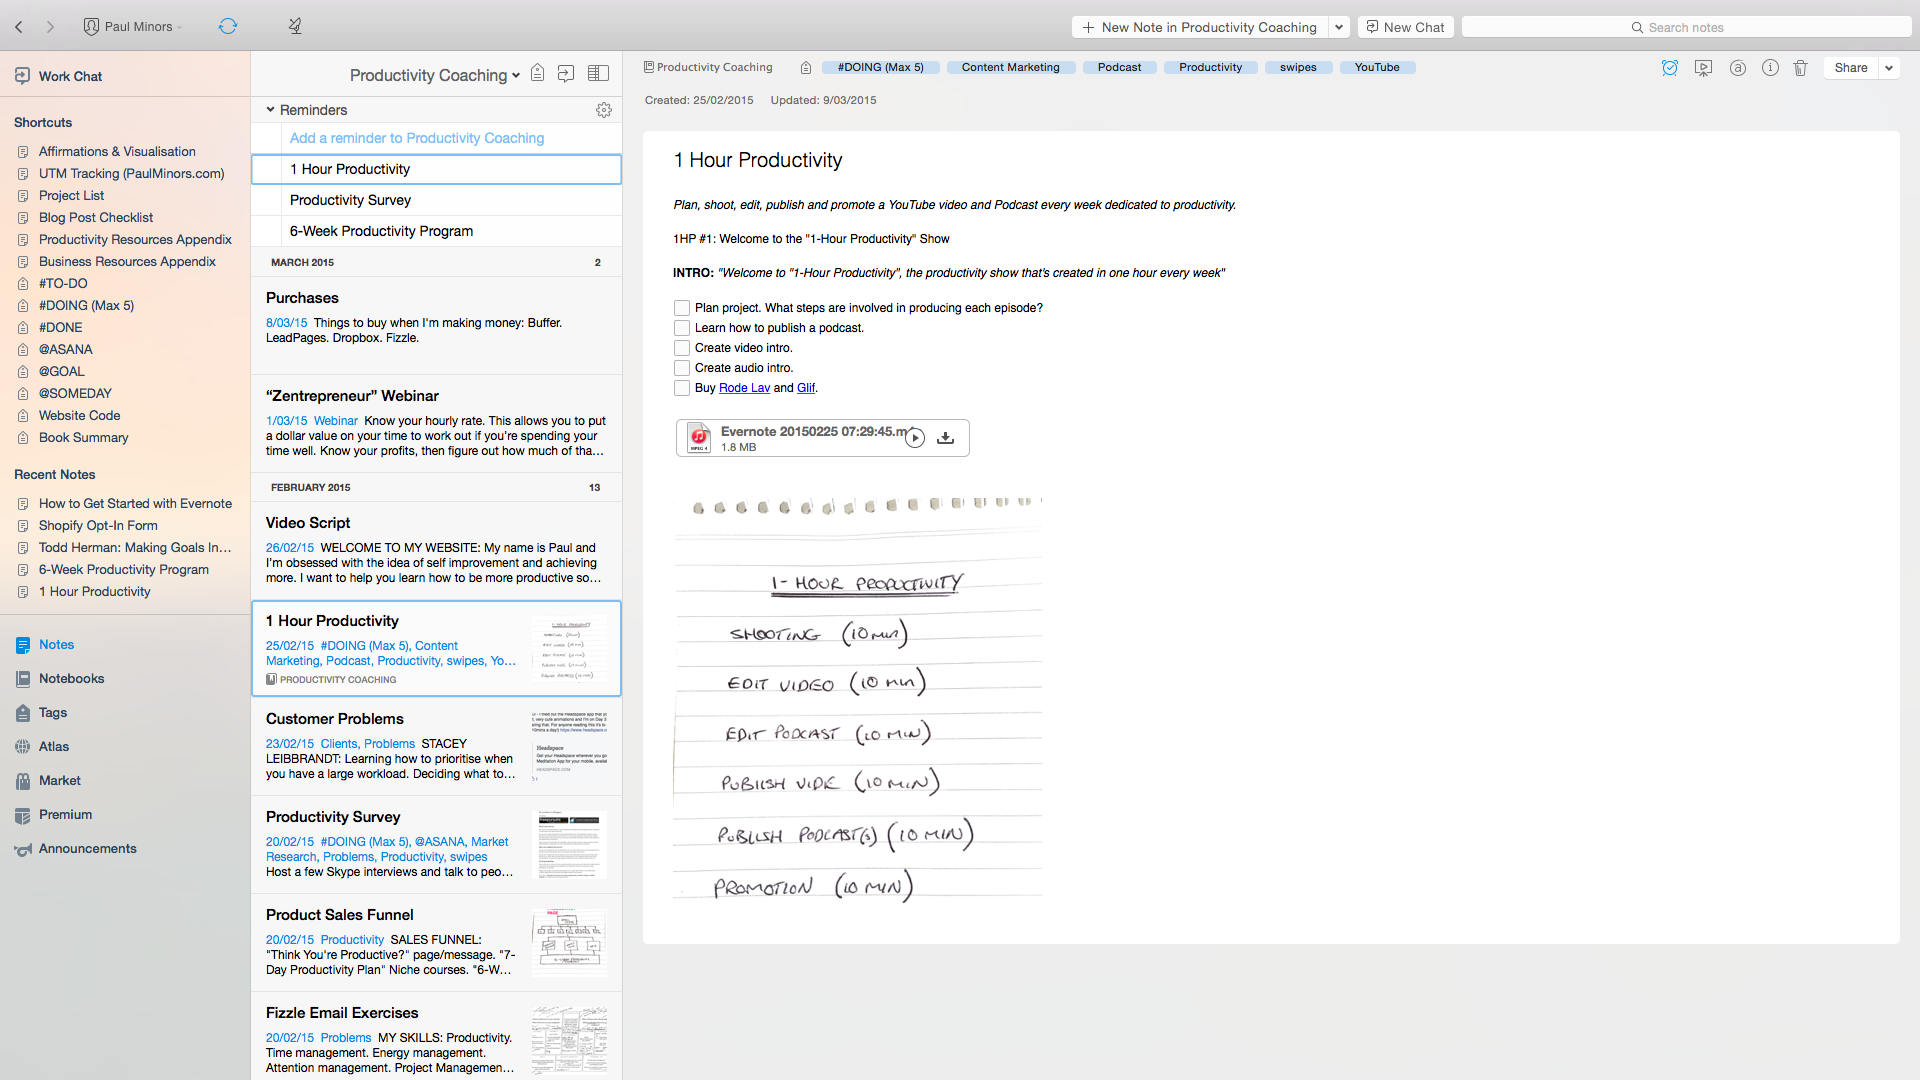
Step Six: Favourite Your Top Tags & Notes
 Once you start creating and organising your notes, I recommend you Favourite your top Tags, Notes and Notebooks to make them more accessible. When you favourite something, it gets moved to your Shortcuts in the top left of the Evernote app. I favourite the Tags and Notes I find myself navigating to the most often so I can find them quickly later. Here's my list of Shortcuts. I've created a simple Kanban system using the #TO-DO, #DOING (Max 5) and #DONE tags. The idea here is that anything I want to do gets tagged with #TO-DO (pretty self explanatory). Then when I'm ready to work on that Note I remove the #TO-DO tag and add #DOING but I can only add this Tag to 5 Notes at once. This is to limit the amount of work I commit to at once and ensures I finish open projects before starting anything new. Once complete, the Tag gets changed to #DONE. You might be thinking: “why do you have a # as part of the tag?”. This is so that the tag appears at the top of my Tags list and Shortcuts, which is sorted alphabetically. The @SOMEDAY tag which I mentioned earlier is used to collect Notes of things I’d like to come back to at a later date. This is a principle borrowed from David Allan's “Getting Things Done” (GTD) as Evernote is the best place to store your future projects.
Step Seven: Go Premium!
Once you've mastered the basics of Evernote, you might find you want to do more and go Premium. By upgrading to Premium, you get the following additional features:
- Extra storage space. As you become an Evernote power-user (like me), you'll want the extra monthly upload allowance for all your Notes. Particularly if you're going to be uploading lots of images and audio notes.
- The ability to annotate PDFs inside Evernote.
- Save your Notebooks onto your phone or tablet and work offline.
- More powerful search. As you type, Evernote will search the contents of your documents, PDFs and other attachments.
- Business card scanning. Evernote wills can the contents of your business cards to create a rich Note which you can turn into a contact on your phone. Link Evernote with LinkedIn and connect with your new contact instantly.
- Context; this is a new Evernote feature which highlights related Notes, articles and contacts underneath your Note. So you can take a photo of someone's business card and get a link to their LinkedIn profile right inside Evernote.
- Presentation mode. This premium feature allows you to instantly turn any Note into a presentation. So effectively all your work is always ready to present to a client or coworker at a seconds notice.
- Extra security. On the iPhone you can enable fingerprint ID to keep your Notes extra safe.
Premium comes at a cost of only $5 a month, which is nothing for all this extra power. I recommend you give Evernote free a try to make sure you're going to get value from it before upgrading to Premium.
There you have it – my seven steps for getting started with Evernote. If you have any questions, leave me a comment below. Or if you have any awesome Evernote tips, let me know. I love learning about new ways to get more out of Evernote.
Have a productive day!