I recently wrote a blog post on how to get started with Evernote and I wanted to follow up with a tour of my Evernote account. In this video I’ll show you have I’ve set up my Notebooks, Tags and Shortcuts for maximum productivity. You can also view my show notes below for a summary of what’s covered. Happy watching!
QUICK SIDE-NOTE: If you need more help getting started with Evernote, I HIGHLY recommend you check out “Evernote Essentials” by Brett Kelly. Brett is a former Evernote employee and his super-cheap eBook is the ideal resource to help you become an Evernote Ninja!
NOTEBOOK STRUCTURE
Setting up the right structures in Evernote is essential for staying organised. When you have the right Notebook setup, it becomes easier to find previous notes and switch between different projects. My Notebooks often change and I’ll add, delete or merge Notebooks to keep projects organised. My Evernote account contains the following Notebooks:
TIP: When setting up your Notebooks, make them mutually exclusive i.e. when creating a Note, it’s obvious which one it fits into. Too often I used to find myself scanning a Notebook for a particular Note only to find it in another Notebook altogether.
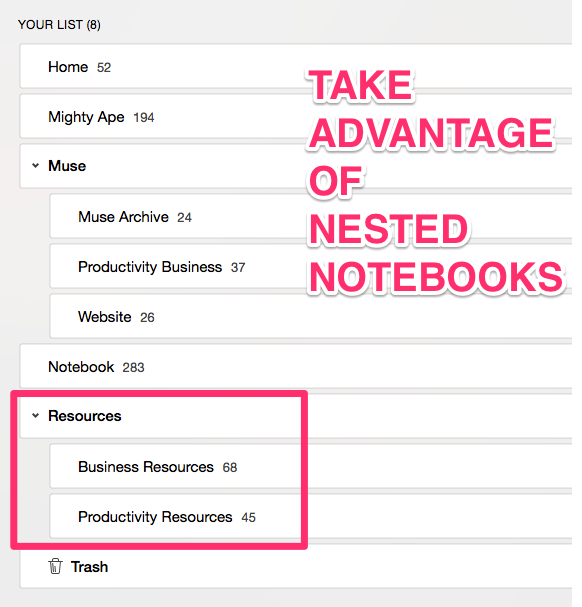 Home – This is where I collect notes related to our house; mainly DIY project ideas, sketches and measurements for things we’re working on.
Mighty Ape – This is where I store Notes related to my work at Mighty Ape. This could be projects I’m working on, resources, analysis documents and reports etc…
Muse – Muse is a parent Notebook for the next three Notebooks. I borrowed the term “Muse” from Tim Ferriss’s “The 4-Hour Work Week”. A muse is basically a business which generates an income without consuming too much time i.e. passive income. As I work full-time, this is how I view my website and what I use to categorise my side-projects.
Muse Archive – This is where I store the Notes from previous Muse Notebooks that no longer exist. Basically two or three Notebooks have been combined into one Archive. I did this to keep my Notebooks organised and reduce the number of Notebooks I have to manage.
Productivity Business – This is where I store the Notes related to my productivity business. It’s where I’m planning out my online course, setting goals, collecting ideas and storing customer feedback.
Website – The “Website” notebook is for any Notes related to the technical side of my business i.e. my website. Where “Productivity Business” is for the business-y Notes, “Website” is for the technical stuff. It’s where I store copies of key bits of code on my site and records of support articles. That kind of thing…
Notebook – Notebook is for general Notes that don’t fit in to any other category. It’s for more personal Notes, receipts and recipes.
Resources – “Resources” is another parent Notebook for the next two Notebooks. I use these Notebooks to organise the articles and blog posts I’ve clipped from the web. I save a lot of useful posts, so I keep these out of my Muse notebooks to make sure the actionable Notes are kept separate from this reference material.
Business Resources – This is where I keep blog posts and articles related to marketing and building a business.
Productivity Resources – This is where I keep any good blog posts related to productivity that I come across. I often draw ideas and inspiration from these Notes and as I have a lot of them, they have their own Notebook.
TAGS
Okay, I have a LOT of tags, so I won’t go through them all. When setting up tags, try and think about the “themes” you can fits Notes into. I use nested Tags to categorise big groups of tags e.g. Marketing.
 Here are a couple of my more important tags; #TO-DO, #DOING (Max 5) and #DONE. These tags refer to a Kanban system I have setup inside Evernote to limit the amount of projects and ideas I can work on at once. Here’s how the system works:
1. I have an idea of something I’d like to do (generally related to my website or business). I’ll create a note with a checklist of things I need to do to complete the project or bring the idea to life. I then tag the Note with #TO-DO.
2. When I’m ready to start working on an idea, I remove the #TO-DO tag and replace it with #DOING (Max 5). But here’s the catch, I can only have 5 Notes with this tag at once. If I want to start on a new idea, I have to complete an existing one.
3. When I finish on a project or idea, I remove the #DOING (Max 5) tag and replace with #DONE. This is a nice way of referencing the ideas or projects that have gone through my Kanban system.
You might be wondering, “what’s with the # in front of each tag for?” This is so the three tags in my system are next to each other in my tags list. It also makes them stand out a little more in my Shortcuts.
You get a lot of power out of Evernote the more you tag. That’s not to say you should go overboard with the number of tags you setup, but make sure that when you create a Note that you spend some time adding all the relevant tags. This makes it easier to find relevant Notes later. It’s also a great way of linking Notes together and grouping different ideas, projects and resources based on different contexts.
SHORTCUTS & APPENDICES
 I’d like to finish up with a quick word about shortcuts and creating an appendices. The Shortcuts menu is where your favourite Notes, Tags and Notebooks are stored. If there are certain Notes you add or refer to on a frequent basis then add it to your Shortcuts. Likewise with important tags. For example, my Kanban tags are kept in my Shortcuts along with my most frequently used Notes.
“Note Links” are an extremely handy way of linking to a particular Note from another Note. Similar to how a link works on the web, except these are links within the Evernote app. I like to create an appendix of important Notes using these Note Links. For example, I have a “Productivity Resources Appendix” which links to every Note inside my Productivity Resources Notebook. This is a nice way of creating a summary of your Notebook and allows you to quickly find certain Notes later. These appendices also live inside my Shortcuts for quick access.
TIP: To create a Note Link, right click on any Note, select “Copy Note Link” then paste this inside any Note you like. Easy!